NServiceKit.Redis这个名字可能听说过的不多,但是在.NET平台使用redis的人一般都接触过ServiceStack.Redis,ServiceStack.Redis从v4开始收费了,NServiceKit.Redis是这个程序的免费开源版本,其源码与ServiceStack.Redis v3基本相同,但是它们好像都不支持SCAN命令(也许是我没发现),尝试用执行Lua Script的ExecLuaAsList等方法也不能返回两个值,所以只好修改了源代码实现这个功能。
SCAN介绍
SCAN cursor [MATCH pattern] [COUNT count]
支持三个参数:
cursor ?类似于数据库查询中的游标,表示开始扫描的位置
MATACH 表示key的匹配模式,全部就是*
COUNT 表示要扫描的数目,返回的数据条数
SCAN执行后每次都返回一个新的cursor,然后用cursor执行下一次SCAN,直到cursor等于0,表示完整迭代完毕。
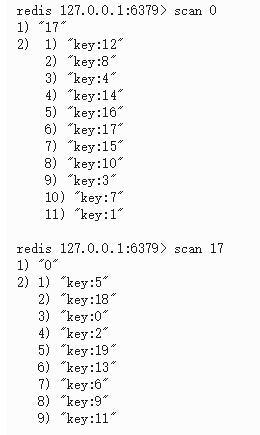
迭代过程示例:
NServiceKit.Redis修改
在NServiceKit.Redis内部其实已经支持返回多个值,RedisClient中的Slowlog就是一个例子,其内部数据结构是一个嵌套数组,方便组装多级多种不同的返回值。
打开NServiceKit.Redis项目中的RedisNativeClient_Utils.cs文件,找到方法:SendExpectDeeplyNestedMultiData:
 protected object[] SendExpectDeeplyNestedMultiData(params byte[][] cmdWithBinaryArgs)
        {
            // 发送要执行的SCAN命令
            if (!SendCommand(cmdWithBinaryArgs))
                throw CreateConnectionError();

            if (Pipeline != null)
            {
                throw new NotSupportedException("Pipeline is not supported.");
            }
            // 读取返回的嵌套数据
            return ReadDeeplyNestedMultiData();
        }
其中又调用了ReadDeeplyNestedMultiData:
        private object[] ReadDeeplyNestedMultiData()
        {
            return (object[])ReadDeeplyNestedMultiDataItem();
        }
其中又调用了ReadDeeplyNestedMultiDataItem,这是个关键的方法:
private object ReadDeeplyNestedMultiDataItem()
        {
            int c = SafeReadByte(); // 读取数据类型
            if (c == -1)
                throw CreateResponseError("No more data");

            var s = ReadLine();
            Log("R: {0}", s);

            // 根据不同的数据类型处理不同
            switch (c)
            {
                case '$': // $开头后跟数据的字节长度,按照这个长度读取数据
                    return ParseSingleLine(string.Concat(char.ToString((char)c), s));

                case '-':
                    throw CreateResponseError(s.StartsWith("ERR") ? s.Substring(4) : s);

                case '*': // *开头后跟数据条数,从下一行开始是相关数据
                    int count;
                    if (int.TryParse(s, out count))
                    {
                        var array = new object[count];
                        for (int i = 0; i < count; i++)
                        {
                            // 如果数据有多级,通过递归方式读取出来
                            array[i] = ReadDeeplyNestedMultiDataItem();
                        }

                        return array;
                    }
                    break;

                default:
                    return s;
            }

            throw CreateResponseError("Unknown reply on multi-request: " + c + s);
        }
通过上边这个方法SCAN命令的返回值就全取到了,下一步就要利用这个方法来实现SCAN命令。
1、修改NServiceKit.Interfaces项目中的IRedisClient接口,增加一个ScanKeys方法。
string[] ScanKeys(ref long cursor, string pattern = null, long? count = null);
三个参数对应SCAN命令的三个参数,cursor是ref的,可以返回下一步迭代的cursor。
返回值是查询到的key数组。
2、修改NServiceKit.Redis项目中的RedisNativeClient类,增加一个Scan方法。
 public object[] Scan(long cursor, string pattern = null, long? count = null)
        {
            if (pattern == null)
                pattern = "*";

            if (count == null)
                count = 10;

            return SendExpectDeeplyNestedMultiData(Commands.Scan, cursor.ToUtf8Bytes(), "MATCH".ToUtf8Bytes(), pattern.ToUtf8Bytes(), "COUNT".ToUtf8Bytes(), count.Value.ToUtf8Bytes());
        }
这是一个底层方法,对返回值不做加工,其中调用了前边提到的SendExpectDeeplyNestedMultiData方法。
NServiceKit.Redis中本没有Scan命令,这里还在Commands类中增加了一个字段Scan:
public readonly static byte[] Scan = "SCAN".ToUtf8Bytes();
3、修改NServiceKit.Redis项目中的RedisClient类,增加一个ScanKeys方法,实现IRedisClient接口中新增的ScanKeys:
public string[] ScanKeys(ref long cursor, string pattern = null, long? count = null)
        {
            var result = base.Scan(cursor, pattern, count);

            if (result.Length <= 0)
            {
                cursor = 0;
                return null;
            }

            // 返回的游标
            cursor = long.Parse(Encoding.UTF8.GetString((byte[])result[0]));

            // 返回的Keys
            if (result.Length > 1)
            {
                var items = (object[])result[1];

                string[] keys = new string[items.Length];
                for (int i = 0; i < items.Length; i++)
                {
                    keys[i] = Encoding.UTF8.GetString((byte[])items[i]);
                }

                return keys;
            }
            return null;
        }
到此NServiceKit.Redis就支持SCAN命令了。
有兴趣的可以改一下试试,或者直接下载我编译的dll:NServiceKit.Redis。
关键字: NServiceKit.Redis Redis SCAN
发表评论
相关文章
国内AI资源汇总,AI聊天、AI绘画、AI写作、AI视频、AI设计、AI编程、AI音乐等,国内顺畅访问,无需科学上网。
扫码或点击进入:萤火AI大全
文章分类
最新评论